DIY: How To Restore Your Deck
DIY: How To Restore Your Deck

Step One: Prepare Your Deck for Restoration
Bring Your Deck Up to Structural Standards
When you decide to restore your deck, you need to make sure the wood is prepared properly to ensure the best finish. Start by locating and replacing any rotting sections. These are typically found in areas that don’t get a lot of direct sunlight or are typically damp, like under a planter. A cost effective way to fix your deck is to only replace the rotted section of the board, rather than the entire piece. To remove the specified section, use a jigsaw to cut a piece that is at least two joint spaces long. This means that the hole will span across two meeting points with a support beam. Cut a new board the same length and size to fill the hole. For a tighter fit, you can cut each board on an angle. This creates a smoother transition between the old and new wood. Another structural aspect to look for are any loose nails. Remove these and replace them with a nail that is one size larger. This larger nail will create a new hole that allows for a better grip.
Clean the Wood on Your Deck
After you have structurally updated your deck, you must clean the wood. Depending upon the state of your wood, you can either use a deck cleaner or a deck stain stripper. The first option is for wood that has gotten dirty over time. The second is for decks that were previously stained and need to be stripped. No matter which product you use, you need to first pre wet the deck in order to activate your cleaner or stain stripper. After you’ve let it sit on your deck for about 30 minutes, you can use a scrub brush to lift any stains and dirt from the wood. A power washer can speed up this process drastically. After it has been properly cleaned, you can sand the sections that you plan to paint or stain. This may not seem like a necessary step, but it gives a better surface for the product to adhere to. This also helps to open up the pores of the wood to soak up the product.
Prime the Wood on Your Deck
There are many options available so be sure to use a wood specific primer for the best results. If you want to help prevent any future rotting in your deck, there are some products that contain mildewcides. While it’s not a guarantee, it does hinder the growth of mildew, algae, and mold. Once you find the right product for your deck, it should be applied in at least two even coats with either a roller or brush. This ensures that the primer can soak into the wood and provide the base that you are looking for. The deck should be allowed to completely dry between coats to ensure the best results. These are general instructions and they may vary slightly depending upon your specific product.
Step Two: Paint or Stain Your Deck
Painting Your Deck
There a few different ways to restore beauty to your wooden deck. Between paints and stains, your deck restoration will have beautiful results no matter what you choose. Painting your deck can give you the custom designs that you’re looking for! There are two different types of exterior paint that both have pros and cons: oil-based and acrylic-based.
Oil-Based Deck Paint
Oil-based exterior paints seem like a solid choice because of its durable base. It dries into a sturdy surface, which seems like exactly what you would want for your exterior surfaces. However, this solid base works against the deck in some cases. Because it is so hard, there is little flexibility to an oil-based paint. As wood expands and contracts with different weather conditions, the oil-based paint cannot change with it. Wood’s movement isn’t only limited to weather changes. Wood naturally changes shape over time. The oil-based paint will crack as it moves. The color of an oil-based paint can also dull over time.

Acrylic Based Deck Paint
Acrylic based paints give you the benefits that you won’t find with oil. The biggest advantage to an acrylic based paint is that it is flexible. The paint will grow and contract with your wooden deck. It also retains its color for long periods of time. This makes acrylic paints a popular option for those restore their exterior surfaces. It should be noted that no matter which base you pick, your primer should have the same base. An oil-based paint will not adhere properly to an acrylic based primer and vice versa. All of the same preparation steps should be taken for both types of exterior paint.
The beauty of painting your deck is the flexibility and creativity you with the products! There is essentially an unlimited number of color options. These different colors can be used in a number of ways. The most basic deck design is to paint your deck a solid color. You can accent a solid color deck with different color railings or steps. If you want to be more creative with your deck, consider a custom paint job on the floor. Outdoor rugs are a recent trend in deck decorating. If you want a permanent option, you can paint an outdoor rug design directly on the wood. The beauty of a painted rug is that you can create the exact design that you envisioned for your deck. If you don’t want to limit your design to a small space, create a geometric pattern across your deck.
Staining Your Deck
Staining your deck gives you a more natural look than paint by highlighting the natural warm tones in the wood. Much like paint, there are two different base options: water and oil. Water based stains are typically the better option as they are easier to clean and are kinder to the vegetation around your deck. There are a few different categories of stains once you’ve chosen your base.
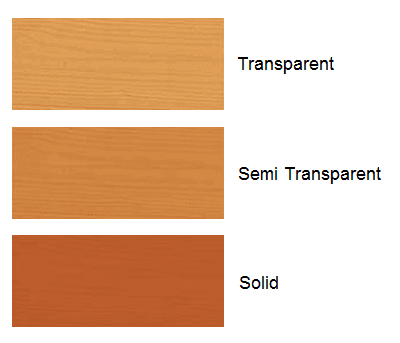
Transparent
Clear stains are completely transparent and allow the natural beauty of your wood to show through. However, because of its lack of pigment, it doesn’t hold up well to UV rays well. The pigment in a colored stain is what provides the UV protection for your deck. Your wood will grey after a few months.
Semi Transparent
The next stain on the spectrum is a semi-transparent stain. This type of stain has a tint for added UV protection, but still allows the wood grain to show through. You are simply adding a richer color to the natural lumber. A semi-transparent stain is maintained through simple cleaning and a reapplication every few years. Because it’s not solid, like a paint, you don’t need to strip the wood before reapplication. These benefits make the semi-transparent stain the best option for most homeowners.
Solid Stain
The last common stain type is a solid stain. As can be assumed from the name, this stain completely covers the wood. This stain works best in spots that have little to no direct UV light. This means it can be a great option for wooden siding, but maybe not for a heavily used deck. Over time, a solid stain peels and fades like paint. This means that when you want to reapply the stain, you must go through the same cleaning process explained above with scraping and power washing.
If you want the decorative nature of paint or a solid stain, but want the low maintenance of a semi-transparent stain, consider two tone stains. By using two different tints of semi-transparent stains, you can create a custom design on your deck. The natural tones of a stain are more subtle than the solid colors of paint and will last longer.
Step Three: Protect Your Deck
Using a Sealant vs. Staining
If you want more of a protective coat between your deck and the elements, consider a sealant instead of a stain. It is important to note that you should not apply a sealant over your stain. They are both products that are made to penetrate the wood grain and they will not adhere to each other well. Some sealants will have a tint to them, creating a stain-sealer hybrid product. When looking for a sealant, as is to be expected with deck products, there are two different bases: water and oil. They have their own benefits depending upon your climate. When applying an oil-based sealant, your deck must be completely dry. It will penetrate the wood deeper than a water base, but only if the wood is completely dry. A water-base sealer is more easily absorbed into a damp deck. It is also easier to clean afterwards. However, because it doesn’t penetrate the wood as deeply as an oil-based, it will not last as long.
 Choose Weather Resistant Materials
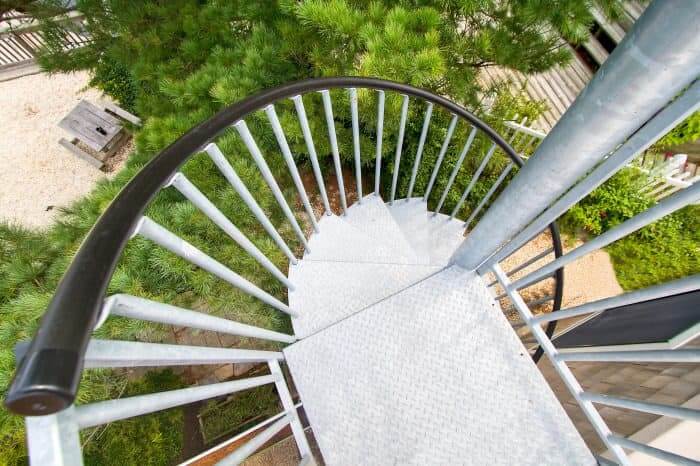
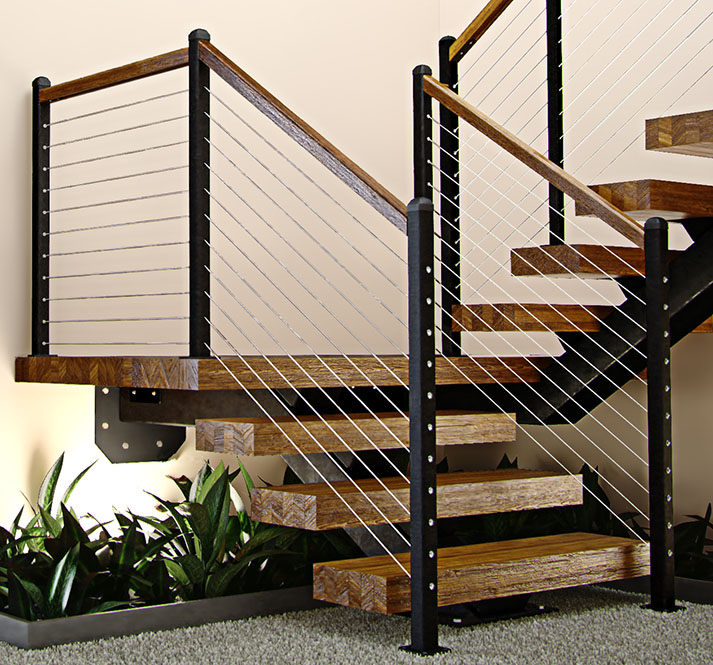
If you want to really create a deck that will last, consider metal accents. Most outdoor deck materials are made to withstand the elements without too much maintenance. Metal railings are a popular option to update a deck. If your deck’s original wooden railings are starting to rot or have seen too much sun damage, consider switching them out for a modern metal railing! If you don’t want to interrupt your view with heavy metal bars, cable railing is the perfect solution. The thin stainless steel cables provide the safety measures that are needed with a deck railing, but don’t overpower the beauty of your backyard. If you have a multilevel deck, you know that wooden deck stairs are easily worn down with heavy use. Consider metal stairs as an alternative. A metal straight stair may seem clunky and out of place in your backyard, but a spiral has the perfect balance of utility and design. The spiral design keeps it from looking like a warehouse stair, while the materials used give you a maintenance free stair. The Aluminum Powder Coated spiral stair can be custom colored to fit seamlessly into your home design. The powder coating finish also creates a weatherproof barrier on the stair. Exterior Galvanized spiral stairs have a modern metallic finish that stands up to all of the elements. The steel is coated in a zinc alloy, creating a protective barrier on your stair. These metal options will surely stand up to the elements much better than a traditional wooden stair.
Restoring your deck doesn’t have to be a complicated process. These three easy steps can help your deck look brand new and stand up to elements. Weather proof pieces on your deck may seem like something that’s too good to be true, but a Galvanized Steel or Powder Coated Aluminum stair could be the perfect addition to your backyard. Give one our of consultative designers a call to get pricing on your project in five minutes or less!
Why Salter
Ready to experience the best in stairs?
Get started with a free, no-hassle consultation.
-

Quick Pricing Within Minutes
-

Expert Design & Sizing Advice
-

Custom Design Options Tailored to your Budget
-

Estimated Product Lead Times
Get started with a free, no-hassle consultation.