Five Weekend DIY Deck Projects
Five Weekend DIY Deck Projects
Each of these steps to having an incredible outdoor entertaining area have been broken down into five easy DIY projects. Each of these projects can be completed in a weekend to create the backyard deck of your dreams! You can jump down to your desired project using these links:
Table of Contents
DIY Deck Frames
DIY Deck Stairs
DIY Deck Restoration
DIY Deck Awnings
DIY Deck Railings
DIY Deck Frames
Design
Square
A raised deck has several different design options. There are a few different shapes that can help to define your home’s exterior style. The traditional deck design features a square or rectangular frame.
The clean lines fits well with a traditional home style. This is the most commonly used deck shape for DIY projects. They are pretty straight forward and consist of a box frame that is attached to supports and secured to the house. You then install lateral supports and secure the frame before your lay your decking material for the floor.
When laying your floor boards, be sure to space them evenly for aesthetic, safety, and draining purposes. Not only does even spacing look much nicer than the alternative, but it also creates a flat surface for you and your guests to walk on.
Leave just enough space for some draining through your floor boards. This will help the wood to dry out faster and reduce some of the risk of rot and damage. If you plan to create an under deck patio, you can add a draining ceiling underneath the floor of your deck to keep that space dry.
Circular
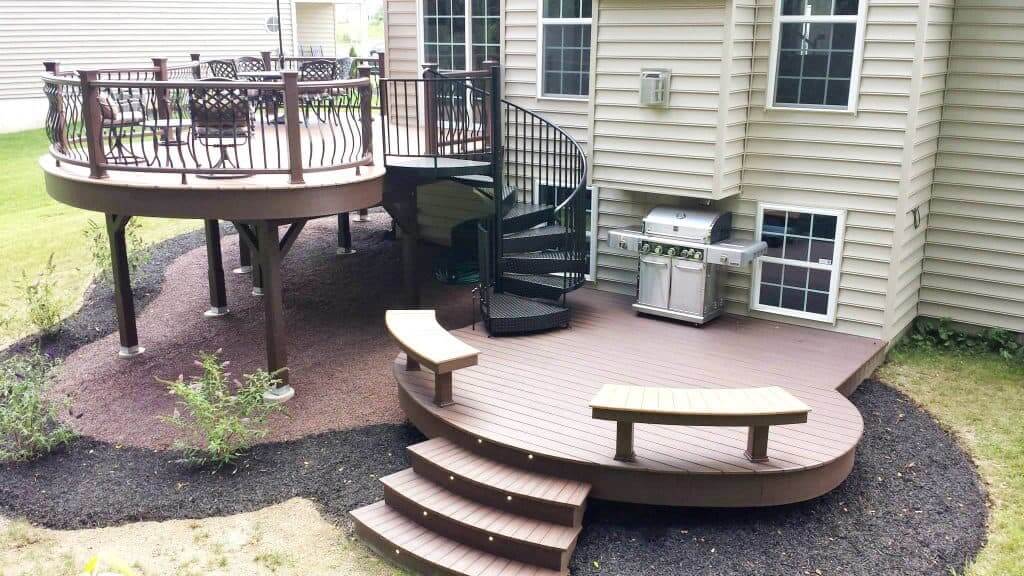
Circular and octagonal deck frames have become grown in popularity recently. They add a unique design feature to your home. Depending upon the materials and décor used, your curved deck can be a rustic gazebo or a modern observation deck.
The beginning of a circular or octagonal do it yourself deck will be similar. Both DIY deck projects begin with supports and attaching your frame to your house. However, the frame itself will be very different.
If you want a unique shape to your deck, octagonal may be an easier DIY project than circular. You can keep the straight edges of the materials and won’t need to do as much prep work. If you want the smooth rounded edges, the difficulty of rounding your decking materials will vary depending upon what material you choose.
Pressure treated lumber can be soaked in water to increase flexibility. Composite decking material is naturally flexible, but will become more so on a hot day. Your lateral supports will be more concentrated in the areas that must support the curve. They should be placed diagonally in close proximity to support the irregular shape of your curve. Octagonal decks will have a sunburst type pattern of lateral supports that will then be supplements by beams connecting each diagonal beam. Your flooring will have to be cut to fit the angles created by the frame.
Supports
The most important part of building your own raised deck is to make sure your vertical supports are secure and stable. This is what will keep your deck standing under heavy foot traffic and bad weather.
Vertical deck supports, or posts, consist of the column and a concrete footer that is poured underground for extra stability. First, you must plan and mark where your posts will be going based on the size and shape of your new deck. Call your local municipality for any building code requirements in terms of how deep your footer must be placed and how much space there is in between the different posts.
Once you’re happy with the placement, pour the concrete and ensure that it has a flat surface that can support the posts. Once the concrete has cured, you can start to place your posts in the ground. It’s important to choose pressure treated lumber that is also rated for ground contact. This means that the wood is treated to stand up to being buried into the ground.
Make the notches for your lateral supports and frames before you secure the posts. When placing the posts you want them to be square and level with the house and each other. When you’re filling the holes back with dirt, make sure you don’t move the posts at all. This would require all new measurements to be made.
Materials
When deciding on your decking material, the two most popular options are lumber and composite decking material. They both have their benefits and drawbacks.
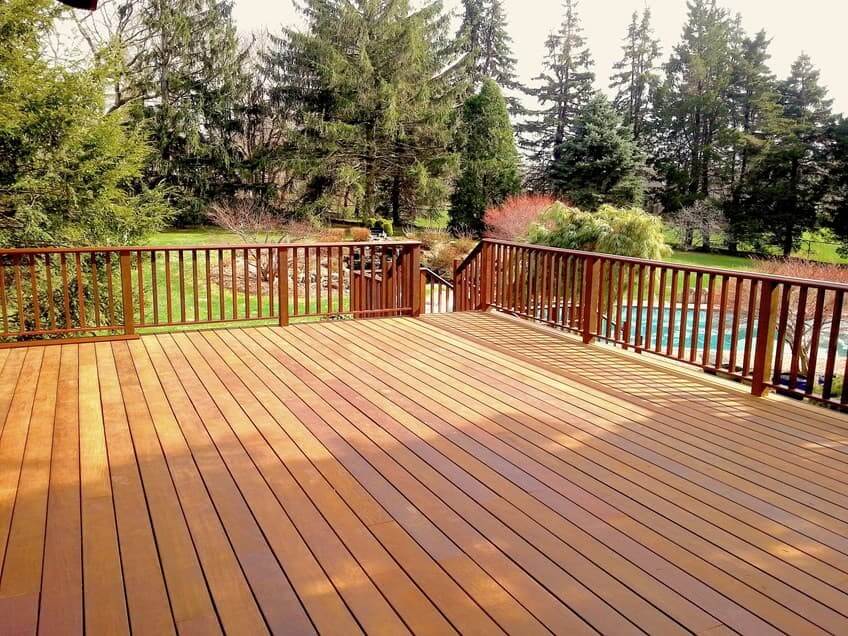
Pressure treated lumber gives you the classic all wood design that many are looking for when they choose to add a raised deck to their home design. They have a lot of versatility when it comes to finishes and are usually the most cost effective options.
However, they will require a refinishing and restoration process every one to two years. You may not need to full replace the wood, but rather just refinish it and repair individual boards.
Composite decking material was made with durability in mind. The boards are made of a combination of wood particles and plastic to create a weather resistant and long lasting material. Most composite products have the look of wood and can easily be installed yourself.
There are some drawbacks to composite decking material. Your finish colors will be limited to the color of the composite materials offered. Stains and paints will not adhere to composite materials like they would with lumber. You also cannot repair the surface of composite materials. Once they are scratched or broken, you must replace them to have the same finish as the rest of your deck.
Cost
The cost of your DIY deck project will entirely depend on your chosen materials. In most cases, pressure treated lumber will be the cheapest option with an average cost between $15 and $25 per square foot. Composite decking materials will usually cost between $35 and $45 per square foot. While composite decking materials are more expensive, you will have little to no maintenance cost.
Installation
DIY deck projects usually take about a week or two weekends. There is a lot of prep work that must go into your deck design before you actually begin constructing the deck. If you plan on having a curved deck design, the prep work will take even longer as you will need to shape your materials. Your finishing process will also affect your building and installation time.
DIY Deck Stairs
Design
Traditional
Traditional deck stairs are the classic all wood straight stair that are usually found on raised decks. The design usually matches the material used for the rest of your deck design. This means using all wood or composite decking materials for your staircase. The same benefits and drawbacks apply to these materials. Composite decking material may be a better fit for stairs as it holds up better to heavy foot traffic. If you’re looking to build your own deck stairs, this DIY deck stair design has a few measurements that are needed before you start building.
Your measurements are probably best and most easily found after your deck has been built. This gives you the exact height of your deck. The first deck stair measurement you will need is the total height, or rise, of your staircase. This can be found by measuring from the ground to the top of your deck floor. This means measuring past any of the lateral supports and to the top of your floor board. Once you have the height, you can find the number of steps needed to reach your deck. You simply divide your total rise by the height of each individual step.
For example, say your total rise is 7’ or 84”. Divide this by 7”, an average height for each stair. You will get 12 steps. The last step will be the deck itself, so you really only have to install 11 steps and 12 risers. To find the length of your staircase, or total run, you will also need your stair’s tread depth, or the width of each step. An average tread depth is 10”. Multiply the number of steps, 11, by the tread depth, 10”, to find the total run of 110” or 9.12’. This large footprint is a defining feature of the traditional staircase.
Spiral Stairs
If you’re looking for a deck stair solution that features a small footprint, a spiral stair may be the best option for you. Because of the spiral design, the stair’s footprint is kept to a small circle in your backyard. This is a great option if you want to maximize space for an under deck patio.
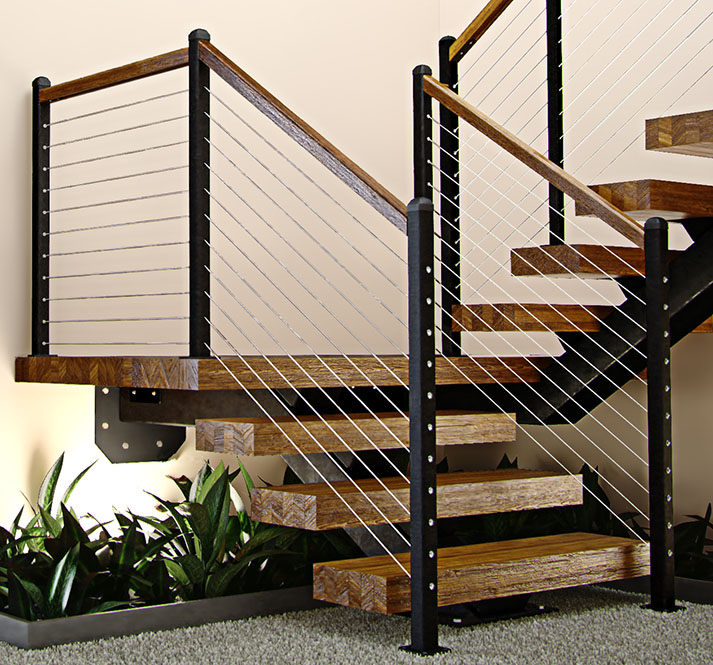
There are two popular outdoor spiral stair options that are both design to stand up to the elements. The first is an Aluminum Powder Coated spiral stair. This design takes the naturally rust prohibitive aluminum stair and treats it with a powder coating process that gives the stair a maintenance free barrier.
While many leave the stair a classic black or white color, custom colors are available upon request. If you want to add a traditional touch to your Aluminum Powder Coated stair, you can choose to have solid wood treads and a solid wood handrail added to your design. These pieces are shipped unfinished so you can match them to your deck stain.
The second outdoor spiral stair is a Galvanized Exterior spiral stair. This durable stair is a steel frame that has been through a hot dipped galvanizing process that coats each part of the stair in a weather resistant finish. This protective barrier makes the Galvanized Exterior design perfect for coastal areas.
Both of these metal designs are made to stand up to the elements and last for a long time without losing any of their structural integrity. The design process may seem intimidating, but our consultative designers take you through each measurement and design choice to create a unique spiral stair design for your backyard.
Cost
As with any home DIY project, your cost will vary depending upon your materials and the scale of your project.
Traditional stairs have a wide range from $500 to $10,000. Because it’s a DIY project, you can choose materials that are cheapest and combine them to build your deck stair.
The least expensive DIY deck stair will be a traditional stair made with scrap wood that you have pieced together. This may not be the most stable or aesthetically pleasing design. If you choose standard pressure treated lumber from a home improvement store and your stair is a standard height, your cost will be around $2,500. If you choose to use composite decking material, your stair will be more expensive.
An outdoor spiral stair will start around $3,000. While the average cost of a spiral stair is higher than a traditional stair, you will have virtually no maintenance costs. Both the Aluminum Powder Coated and Exterior Galvanized spiral stairs have maintenance free finishes meaning that your first cost is your only cost.
Installation
Installation of traditional stairs can be completed in a day or two. Because of the vast amount of measurements, it may take longer. If any measurements are off, you will need to interrupt the installation in order to fix the problem. The most important part of your DIY deck stair installation is to ensure the stability of your staircase.
Spiral stairs have an easy installation that you can complete in a day with the help of a spouse, friend, or neighbor. Spiral stairs are shipped broken down in a kit form with each piece being individually wrapped. Each of these pieces fit together like a big erector set and can be secured with nuts and bolts.
DIY Deck Restoration
Process
Repair
Before you decide to clean and refinish your deck, you must repair any parts of your deck that are unstable or broken. This includes loose floorboards, splintering railings, and any rotting wood. This process really only applies to all wood decks, as composite decking material will not splinter or crack.
If you want to replace any scratched composite boards, you would do this now. If you want to replace only part of a floor board, use a jigsaw to cut this specific section from the deck. You can then cut an identical piece from your new lumber to fit the hole in the deck. To create a tighter fit and ensure the stability of the new board, cut your boards on an angle.
If there are any loose nails, use a larger nail size to replace them. This creates a new larger hole that will be a tighter fit.
Clean
The first step in this DIY deck project is to clean your deck. This is essential to restoring your deck as any new stains and paints will adhere much better to clean wood. There are two different products to clean your deck: deck cleaner and deck stain stripper. The first can be used with a power washer to clean a deck that has simply gotten dirty over time. A deck stain stripper is used with a scrub brush and takes any remaining stain off your deck, leaving you with plain wood. This is the best choice for those who want to restain their deck for a new look.
Finish
If you plan to refinish your deck, you should sand your deck after the cleaning process. This gives the stain or paint a completely new and porous surface to adhere to. By taking off the dull surface layer of the wood, you are giving the stain a better chance to permeate the wood grain and create a long lasting finish. Depending upon the design you’re going for, you can choose several different finishing materials from the list below to have the DIY deck of your dreams.
Materials
Stains
Stains allow the natural beauty of your all wood deck to shine through. One of the benefits to using lumber is that it has warm tones that cater themselves to homey designs. This is perfect for homes that want a rustic or traditional design aesthetic for their deck. You can choose either an oil based or water based stain. Water based stains are the more popular option as they are easier to clean and are kinder to any plants around your deck.
There are three different kinds of stains for your deck: transparent, semitransparent, and solid.
Transparent stains are clear and allow the natural color of your wood to shine through. The one drawback to this stain is that the lack of pigment also means a lack of UV protection for your deck. This causes your lumber to grey more quickly than using a stain with pigment.
Semitransparent stains are the next level of protection. They still allow the wood grain to show through, but there is a small amount of tint.
The most protection to you can get from a stain will be from a solid deck stain. This product is completely opaque and allows no direct UV rays to reach the wood of your deck. It will peel and flake off of your deck over time and will need to be restored more frequently than your other options.
Paint
If you want a wider color range than the natural tones of wood, you’ll want to use a paint that is made for outdoor applications. You can either use an oil based paint product or an acrylic based product. They both have their pros and cons. Oil based paints provide a durable base, but doesn’t react well to the expanding and contracting nature of lumber. Acrylic based paints are more flexible and are a better option for decks in wet climates.
Cost
The cost of restoring your deck will vary depending upon how much really needs to be done. If you need to replace any lumber or composite materials, the same price mentioned in the deck structure section applies. Pressure treated lumber has an average cost between $15 and $25 per square foot. Composite decking materials will usually cost between $35 and $45 per square foot.
Time for Restoration
Unless there is a lot of intensive repairs that need to be done, DIY deck restoration can be completed in a weekend. Replacing boards and nails can be done in an afternoon. The time consuming part of a deck restoration will be the cleaning and refinishing process. If you can, clean the deck in the morning before the afternoon. This allows it to dry as the sun becomes hotter throughout the day. You want the lumber to be completely dry before staining or painting the deck. This allows the product to fully permeate the wood grain.
DIY Deck Awnings
Designs
Adding shade to your raised deck is a common DIY deck project. While you love to soak up the sun in nice weather, you also want some shelter for either the rain or a particularly hot day. This shaded area can take on a few different designs.
One easy DIY project is a pergola. It’s all wood frame makes it an easy project to put together. It’s made from a simple box frame with lattice walls and a grid like roof. The lateral beams can hold a few different options for shade.
The most common shade solution with a pergola is to add curtains. They can be strung across the roof of your small structure on cables to create a retractable awning design. If you want to add more green space to your deck, you can use climbing plants to create a living wall style of awning.
Materials
Most pergolas are made from naturally rot resistant wood types. Because they are used to protect your deck from poor weather, you want it to stand up to the elements. You may still need to restore them every so often, but by using a rot resistant wood, your maintenance will be cut down drastically.
Teak is a common choice for DIY pergola projects because of its durability and water resistance. It has a naturally lighter color but it can be stained to match a darker deck.
Another durable and rot resistant wood choice is California redwood. This wood is becoming more and more exclusive as it can only be found in California and some western states. It has a richer natural finish than teak, but is also a lot harder to find.
Cost
Rot resistant wood is going to be much more expensive than your standard pressure treated lumber. Because of their exclusivity, you will most likely have to go through a lumber yard to get your pergola wood. Depending upon your location and the amount of wood you’re looking for, the cost of lumber could range from $20 per board to $40 per board. While this may seem like an outrageous cost, your maintenance costs will be much lower.
Installation
This simple frame can be constructed and installed on your deck in a weekend. Hardwoods that are rot resistant, such as teak and California redwood, tend to be more difficult to cut. Factor this into your timeline and leave a day for simply cutting your boards.
DIY Deck Railing
Design
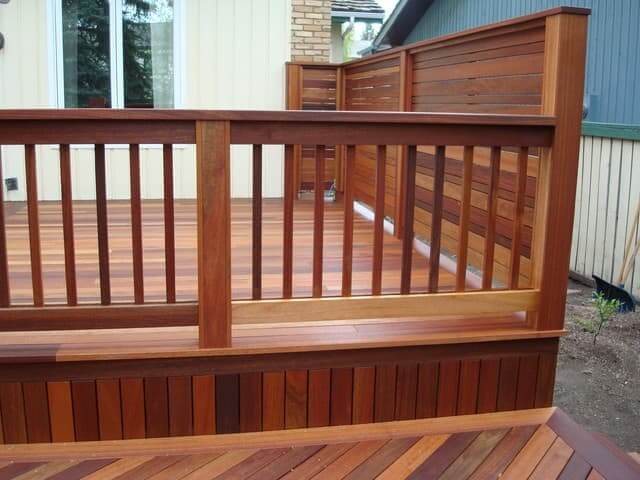
Your deck railing is a standard design choice when it comes to designing and building your raised deck. If your deck is more than 30”, or 2.5’, off the ground, you must have a railing along the perimeter of your deck to meet building code. Building code is a collection of safety standards that all building must meet if they want to pass inspection. Not only is it required if you plan to sell or rent out the property, but it also ensure the safety of you and your guests. Most deck railings are a traditional all wood design to match the deck. This consists of square spindles and a top banister that connects them all. More modern homes may feature cable railing or glass panels to close off their deck.
Materials
If you choose to have an all wood deck railing to match your deck, you can use pressure treated lumber to match the rest of your deck design. You can stain it or paint it to match your exact deck color as well. If you have a composite deck, there are several different composite deck railing systems. You can find a system that matches the color of your deck floor boards. If you want a no maintenance railing system that has a traditional look, white PVC railing is a popular choice.
Cost
Once again, the cost will depend on your material choice and how large your deck is. Pressure treated lumber will be the same price as the lumber you used for your deck. Composite railing kits range between $50 and $100 depending upon the company, color, and how many feet of railing is provided in the kit. PVC railing kits will have about the same range as composite railing systems.
Installation
Your deck railing is a simple installation that can be completed in an afternoon. If you choose the all wood design, you can build it into the deck frame itself. Install your vertical posts, these are usually at the corners of your deck and then in equal intervals throughout the sides of the deck. Once the posts are in place, you build the middle sections of the deck railing from bottom to top.
First install the bottom railing. From there you’ll install the spindles, or balusters. You want these to be evenly spaced for a uniform and polished look. Once those are all in place, you add your top railing. This is the final piece of your deck railing and keeps your balusters in place and secures the entire railing system.
If you choose a composite or PVC deck railing system, installation is very simple. There are sleeves that fit over the wooden deck posts and are attached with brackets. These have notches and spaces for the bottom and top rail to fit into. Once the bottom rail is in place, you can insert the balusters into the bottom rail. The top rail then fits over all of the balusters and into a pocket in the post.
Deck updates can seem intimidating, but with these quick projects you can have your deck summer ready in a few weekends! All of these projects take less than a weekend to complete and are the perfect way to add small updates to your backyard deck. If a new railing or deck stair is the right deck project for you, call one of our consultative designers to get pricing in five minutes or less!
Why Salter
Ready to experience the best in stairs?
Get started with a free, no-hassle consultation.
-

Quick Pricing Within Minutes
-

Expert Design & Sizing Advice
-

Custom Design Options Tailored to your Budget
-

Estimated Product Lead Times
Get started with a free, no-hassle consultation.